Have you ever watched a group of kids turn absolutely giddy at the mere sight of desserts-in-disguise? Rice krispie ice cream cones have that effect every single time—at least, that’s what happened in my kitchen when Lila, Ethan, and Basil (tail wagging furiously) circled the counter and declared it was “the best treat night ever.
Picture this: crispy cereal meets sticky marshmallow, all tucked snug inside a crunchy cone and crowned with sprinkles and chocolate—no scooping freezer-hard ice cream, no baking, just simple steps and instant, joyful mess.
If you’re a busy home cook (or parent on snack duty), you know the magic of recipes that:
- Light up little faces, especially at parties or after-school playdates
- Come together with pantry staples—no fancy shopping lists or last-minute dashes
- Deliver fun you can share and decorate in under 30 minutes
Best of all, rice krispie ice cream cones are totally no-bake, endlessly adaptable, and practically guaranteed to spark giggles (and, yes, maybe a few sticky fingerprints).
This isn’t just about the treat—it’s about building new kitchen memories. My kids can’t agree who decorates the best “scoop,” but they definitely agree it’s the tastiest ten minutes of their week.
You’ll get my family-tested tips for:
- Making the classic marshmallow mixture without fuss
- Shaping perfect cones with minimal mess
- Customizing each one for birthday parties, school sales, or just a sweet Saturday afternoon
No specialty store hunts, no pastry chef skills required. You bring the cereal and marshmallows; I’ll walk you through every step, right beside you like the friend who always has extra napkins ready.
So—are you craving a batch of rice krispie ice cream cones that’s playful, totally doable, and packed with easy kitchen joy?
Let’s get those aprons on and jump straight into why this is my favorite pick for family treat nights.
Table of Contents
Why You’ll Love This Recipe
There’s something downright magical about whipping up rice krispie ice cream cones in a lively family kitchen.
The first time I made a batch with Ethan and Lila, the kitchen echoed with giggles, and sticky fingers left trails of marshmallow on every knob—absolutely worth it.
These no-bake, all-fun cones come together in under 30 minutes, making them perfect for:
- Parties and sleepovers (kids LOVE decorating)
- Family movie nights when you need a treat, fast
- Last-minute bake sale wonders you can make with pantry basics
Nostalgia & Kid-Approved Joy
You don’t need fancy ingredients or a pastry chef’s patience for rice krispie ice cream cones—just Rice Krispie cereal, mini marshmallows, butter, and a handful of mix-ins.
Want to build new family memories?
Here’s your recipe for big smiles.
I’ll never forget the look on Lila’s face the first time her “scoop” stuck to the cone without falling—she cheered louder than Basil barking at the mail truck.
- Use cake cones for a classic crunch, or sugar cones for extra sweetness
- Swap in large marshmallows if that’s all you have handy
- Try colored candy melts or sprinkles to match any holiday or birthday bash
Customization = Creativity (and Less Stress!)
Rice krispie ice cream cones are endlessly adaptable—change up colors for school events or toss in themed candy for birthday joy.
Invite the kids to design their own; let them pick the toppings and try wild color combos.
You’ll be surprised by what they dream up!
- Need more inspiration? Peek at my “mini masterpieces” in the bite-sized version here: Mini Rice Krispie Ice Cream Cones
- National Ice Cream Day is the perfect excuse to bring these playful cones to your party table.
There’s nothing like the simple joy of seeing little hands proud of their kitchen creations.
Messy fingers, big grins, and shared stories—that’s what these cones are really about.
Ingredients & Equipment
Rice Krispie Ice Cream Cones Essentials
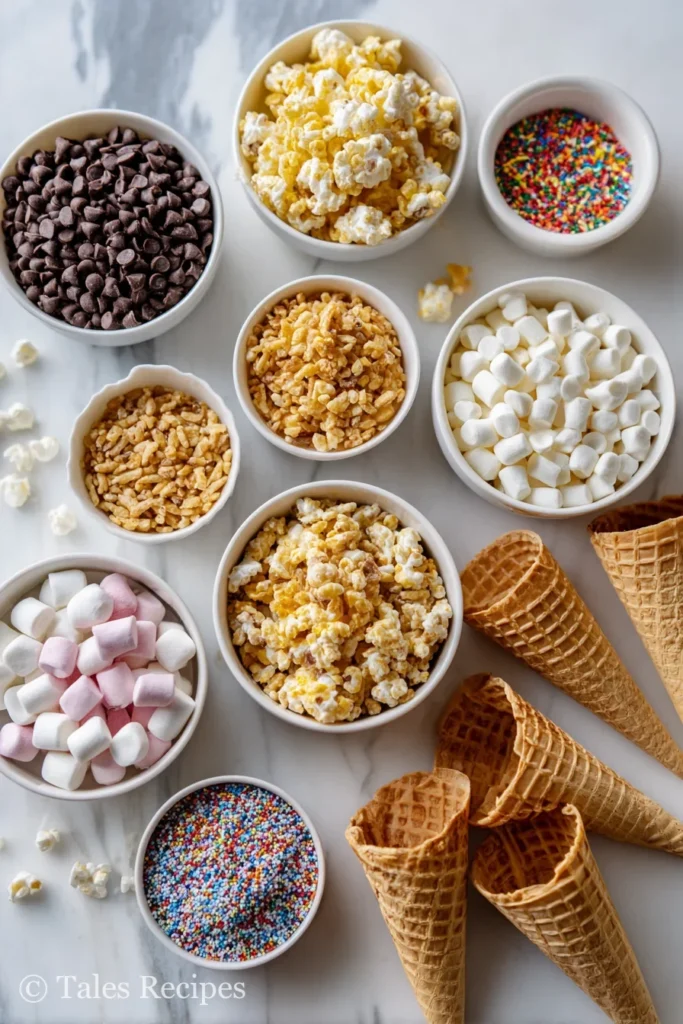
If you’ve got a craving for rice krispie ice cream cones, you’ll love the simple, everyday ingredients that make this nostalgic treat possible.
All you need are:
- Rice Krispie cereal (5 cups for one batch)
- Mini marshmallows (about 5 1/2 cups, divided)
- Butter (4 tablespoons)
- Ice cream cones (cake or sugar cones—your pick)
- Chocolate chips or candy melts (1 cup, for dipping and drizzling)
- Assorted candies (like M&Ms or gummy bears—half a cup)
- Sprinkles (because fun is part of the recipe)
- Maraschino cherries (optional, for a sweet finishing touch)
I always pick up everything in one supermarket run—no specialty stores needed. If you’re short on mini marshmallows, large ones work too; just snip them up.
“Keep it flexible—adapt Rice Krispie ice cream cones to whatever you have on hand.”
Choosing Cones & Allergy-Friendly Options
Deciding between cake cones and sugar cones? Cake cones stand up easier (especially for little hands), while sugar cones are crunchier and slightly sweeter.
For allergies or dietary tweaks, look for:
- Nut-free cones (most brands are, but check the label)
- Gluten-free cones (now easy to find at larger grocery chains)
- Dairy-free butter substitutes work beautifully for a vegan option
Equipment Breakdown & Mess-Free Prep
Gathering the right tools makes the whole process run smoother:
- Large mixing bowl (so there’s room for stirring)
- Microwave-safe bowl (or a small pot, if stovetop is better for you)
- Wooden spoon or sturdy spatula (those marshmallows get sticky!)
- Ice cream scoop (for shaping perfect ‘scoops’)
- Wax or parchment paper (less sticking, more fun)
Want a cleaner counter? I always:
- Set out a parchment-lined tray before mixing begins
- Use light cooking spray on spoons, bowls, and hands (a lifesaver when kids help)
My go-to trick when Lila and Ethan join in: each gets their own mini scoop and a little bowl of sprinkles to avoid squabbles (and minimize cleanup).
Stocking up on these basics lets you whip up delicious, party-ready rice krispie ice cream cones in under 30 minutes—just gather your crew, and get ready for sticky fingers and big smiles.
Takeaway: With pantry staples, kid-friendly tools, and Emma’s mess-saving tips, you’ll be set up for a batch of rice krispie ice cream cones that’s low-stress, irresistible, and ready for sharing.
Step-by-Step Instructions
Making rice krispie ice cream cones is pure hands-on magic—no oven required and kid laughter guaranteed.
Ready to get started? Here’s how I do it in my kitchen so you can follow along, sprinkle-covered and all.
1. Make the Classic Rice Krispie Mixture
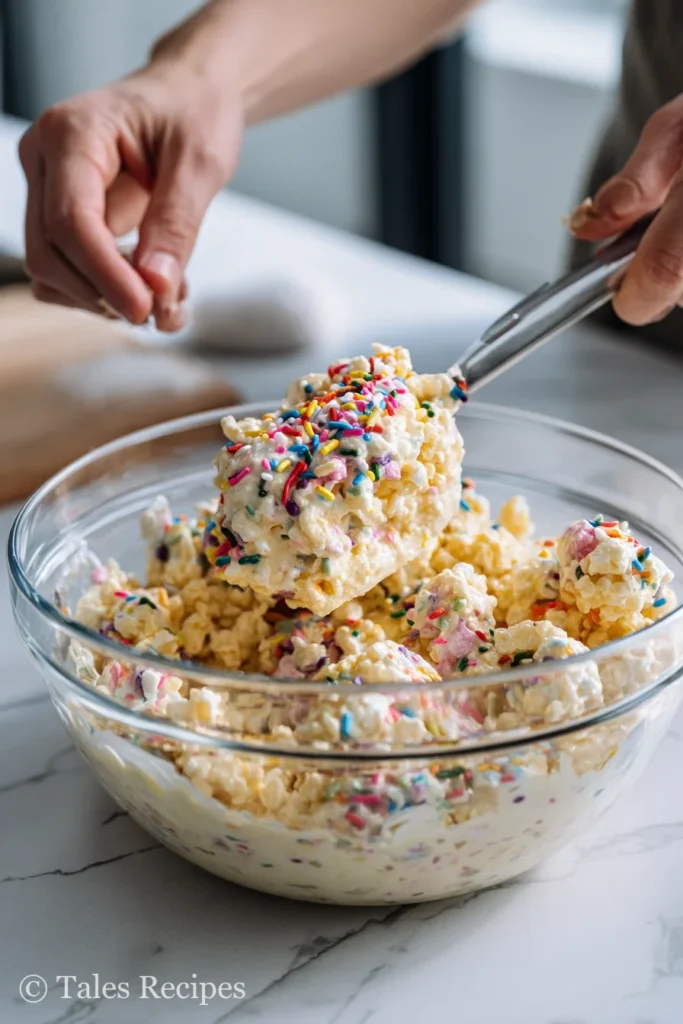
Start by combining mini marshmallows and butter in a big microwave-safe bowl.
- Microwave on high for about 1 minute, watching as the marshmallows puff up like little clouds.
- Stir until smooth and glossy (the melted-butter smell always brings Ethan running).
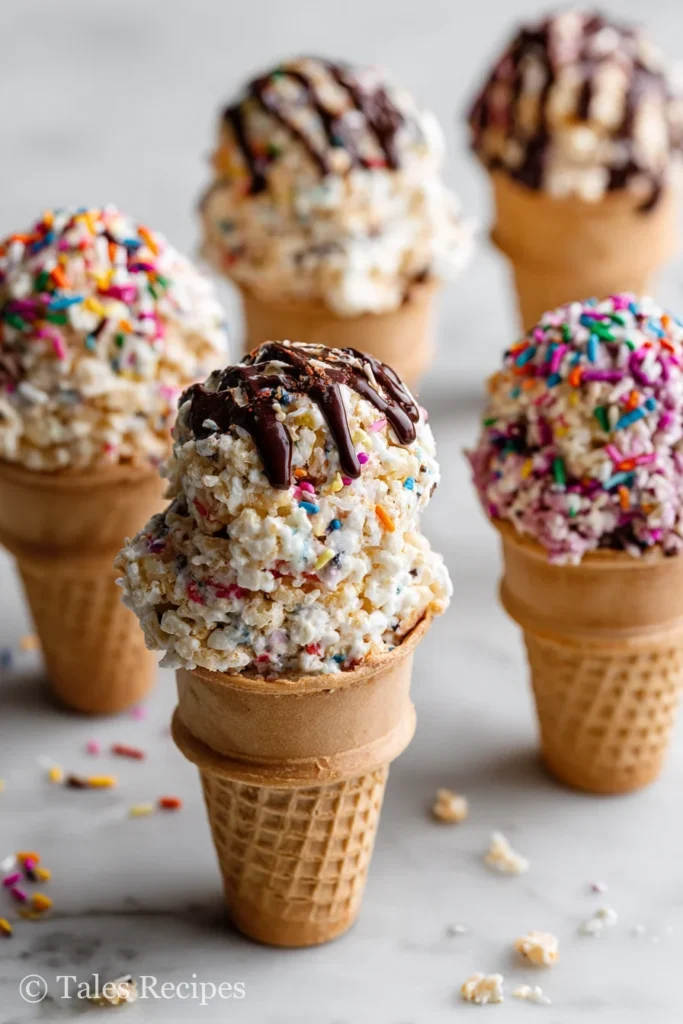
- Pour in Rice Krispie cereal and gently fold until every bit is coated and sticky.
I love adding an extra handful of mini marshmallows and colorful sprinkles at the end. You’ll find hidden gooey pockets and pops of color—always a winner for “wow” factor.
2. Shape the “Ice Cream” Scoops

Now comes the shaping—sticky fun ahead!
- Spray your ice cream scoop and hands with nonstick spray or rub with butter.
- While the mix is still warm (but safe to touch), scoop up a generous mound and press gently into a round ball.
- Set each scoop on wax paper to cool for a few minutes.
When I do this with the kids, we race—who can make the roundest “scoop”? My tip: let them cool just enough so little hands can join the decorating party without “ouch!” moments.
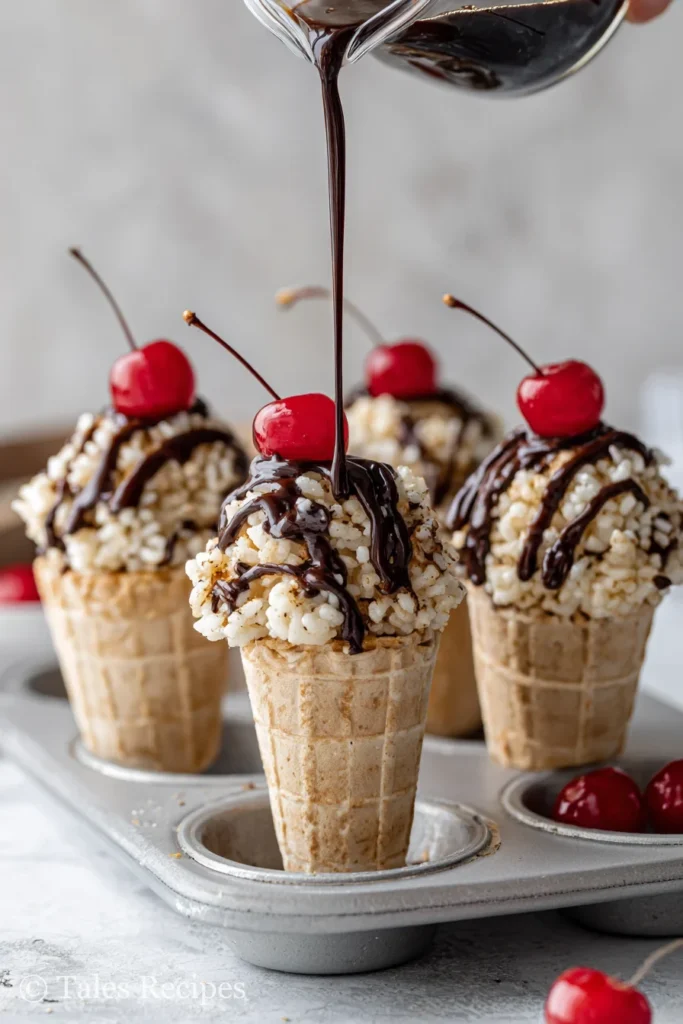
3. Prep and Fill the Cones
Melt your chocolate chips or candy melts in the microwave until smooth.
- Dip the rim of each cone for a sweet chocolate collar (you can never have too much, right?).
- For balance, drop a few candies inside—this keeps cones from toppling and is a favorite kid surprise.
Avoid drips by gently turning the cone before setting it aside—a trick learned after too many chocolatey fingerprints.
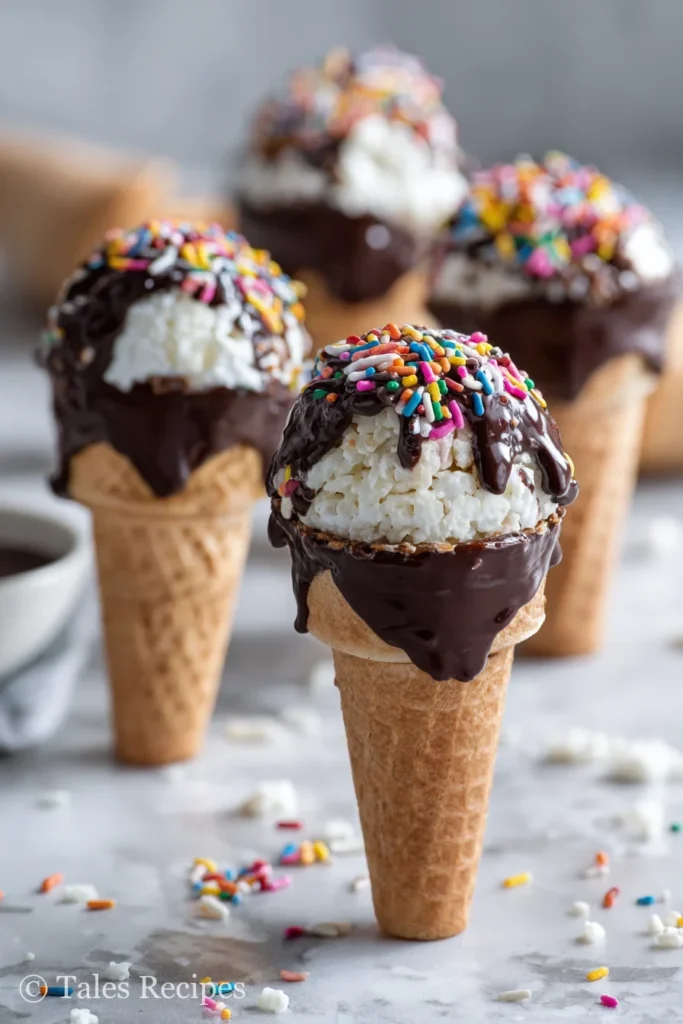
4. Assemble and Decorate Like a Pro
With your cones and scoops set:
- Press a rice krispie scoop firmly onto each chocolate-dipped cone.
- Stand cones upright (a muffin tin helps!) as they set.
- Drizzle extra chocolate on the top, scatter on sprinkles, and finish each with a maraschino cherry or favorite candy.
This is where the real personality shines—let the kids go wild!
5. Set, Store, and Serve
Let the cones cool at room temp until chocolate is firm (about 10 minutes if you can wait).
- Store rice krispie ice cream cones in an airtight container for up to 2 days.
- Making ahead for a party? They’ll hold their crispness overnight, no problem.
Think of this recipe as your ticket to tactile, shared joy: “Messy hands. Big smiles. Unforgettable moments.” Now that’s my kind of kitchen magic.
Tips, Variations & Troubleshooting
Easy Fixes for Common Rice Krispie Ice Cream Cones Challenges
Making rice krispie ice cream cones is fun, but sticky hands and lopsided cones can pop up.
Want the mixture not to stick everywhere? Grease your scoop, bowl, and hands with a little butter or non-stick spray. This small step keeps marshmallow goo under control and lets little helpers join in (without turning into marshmallow monsters).
Favorite phrase in our kitchen: “It’s hands-on, not hand-glued!”
If your scoops turn out flat or misshapen, the trick is to shape them while the mixture is still warm but not hot—just be gentle.
For perfect rounds:
- Use an ice cream scoop greased with butter.
- Gently pack, then roll the scoop with lightly greased palms.
Playful tip: Let the scoops cool for a couple minutes, then invite kids to help decorate—they love this part and it keeps them busy!
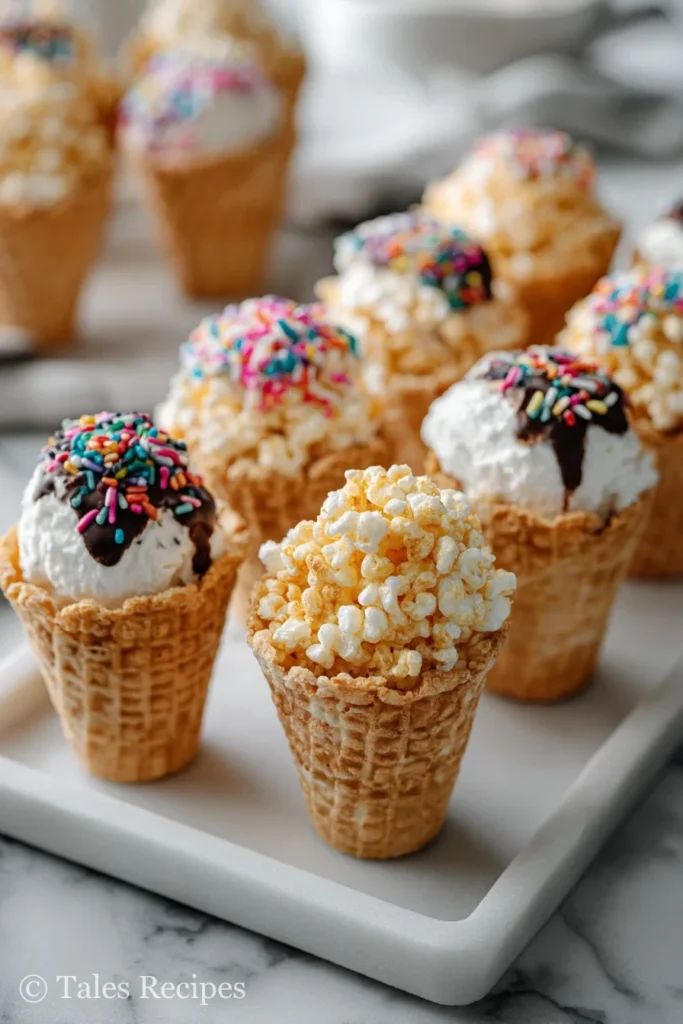
Swaps, Variations & Themed Fun
Ready to get creative? Rice krispie ice cream cones are as customizable as your snack drawer.
Try these easy twists:
- Colorful candy melts: Pink for “strawberry,” green for “mint,” white chocolate for “birthday cake.”
- Sprinkles or sanding sugar for sparkle.
- Mini cones (tiny cones + melon baller) for bite-size party treats.
- Themed candies for holidays—red/green for winter, pastels for spring.
Short on ingredients? Swap mini marshmallows with large ones or use nut-free/ gluten-free cereals as needed.
Balancing Tricks & Make-Ahead Tips
Tired of toppled cones? Here’s the simple fix:
- Toss a few candies inside each cone before adding the scoop. It helps anchor the cone and is a sweet surprise later.
Keep cones upright while setting by standing them in a muffin tin or a deep-sided baking dish. It’s my secret to a tidy countertop and perfect presentation.
Making ahead? Rice krispie ice cream cones set in about 30 minutes and keep crispy for up to 2 days in an airtight container. *Perfect for birthdays or busy weeknights when you need dessert to wow without work.*
In our house, the best kitchen memories come with a little mess and a lot of laughter. Use these ideas to make your rice krispie ice cream cones even better—then share your own tips or kitchen stories with me in the comments.
Nutrition Facts and Fun Facts
Nutritional Information at a Glance
Let’s talk about the basics: one rice krispie ice cream cone (with a sprinkle of chocolate and candy, plus cone) contains about 130–180 calories per serving, depending on toppings and cone size.
You’ll find each cone is about the size of a classic cereal treat—just a bit more dressed up.
Remember, these are an occasional sweet treat at our house; I always tell Ethan (who would happily gobble three), “One is usually just perfect after dinner!”
For families managing food allergies or watching sodium, I recommend checking trusted nutrition guides like this rice cereal treats resource.
Each cone mainly provides:
- Carbohydrates: from cereal, marshmallows, and cone
- Simple sugars: marshmallows and candy
- A little fat: from butter and chocolate
Kids love them, but these are definitely a party moment—not a lunch box staple.
Fun Trivia and Family History
Did you know Rice Krispie treats were invented by Mildred Day in 1939 for a Girl Scouts fundraiser?
Since then, they’ve become a staple at bake sales, sleepovers, and birthday parties everywhere, with so many versions popping up on family tables.
Now, combine that with ice cream’s magical, celebratory role—think birthdays, block parties, and summer evenings on the porch—and you get a dessert that triggers all kinds of happy nostalgia.
Want to celebrate National Ice Cream Day? Mark your calendars for July (National Ice Cream Day) and let these cones shine at your next gathering or school treat day.
Quick fun facts to share with kids:
- The snap, crackle, and pop mascot trio has starred in Rice Krispie ads since the 1930s.
- Swapping in gluten-free cereal or allergy-friendly cones means everyone can join the fun!
Sweet Moments to Remember
Just picture it: sticky fingers, giggles around the kitchen counter, and that first bite of crispy-chewy sweetness.
If you want to make a treat that’s both playful and practical, rice krispie ice cream cones are a tradition waiting to happen.
For those who love more classic ideas, you’ll also enjoy this Rice Krispie Treats Recipe, another crowd-pleaser from my kitchen to yours!
Flavor Pairing & Serving Ideas
Rice krispie ice cream cones aren’t just playful—they’re a ticket to easy smiles at every gathering.
Whether you’re prepping for a backyard birthday, a summer pool party, or a cozy movie night with pajamas and popcorn, these crispy cones land at the top of my dessert list.
Kids can’t resist the snap of Rice Krispie cereal paired with gooey marshmallow “ice cream.”
Picture this: you walk outside with a tray of sprinkle-topped cones and a chorus of little voices bursts into laughter as they grab their favorite color.
Who says only ice cream deserves cones on a hot day?
Serve with More Fun on the Table
Pairing your rice krispie ice cream cones with other simple, crowd-pleasing treats turns an ordinary night into a mini dessert carnival.
My go-to combos are:
- A slice of no-bake cheesecake for creamy, tart contrast
- A swirl of easy chocolate mousse for anyone who can’t get enough chocolate
- Bowls of fresh fruit salad for bright color and balance
Set out these treats on one big tray, and you’ll watch the crowd come back for seconds—and thirds, if you’re not looking!
Sips for Every Age
Drinks are half the fun, especially for the littles (and grown-ups needing a pick-me-up).
Keep it classic or add a playful twist:
- Cold milk makes every bite taste extra nostalgic (Ethan claims it’s “better than cookies!”)
- Coffee or iced lattes for adults—because nothing says “grownup treat” like a sweet bite and a cafe-style sip side by side
Share Your Serving Traditions
I love hearing how families enjoy these cones—maybe you dip them in melted peanut butter, or balance them on cupcakes for a double surprise.
Tell me your favorite rice krispie ice cream cone pairings or party stories in the comments!
These whimsical treats are all about sharing joy and creating memories, one sticky hand at a time.
There’s more than one way to serve up fun, and I can’t wait to see what you dream up next.
Ready to Make Kitchen Memories With Rice Krispie Ice Cream Cones?
Rice krispie ice cream cones aren’t just a recipe—they’re your invitation to laughter, creative mess, and simple joy around your own kitchen table. Who knew that a handful of cereal and marshmallows could spark such big grins and new family traditions?
You don’t need fancy ingredients or extra time—just an open pantry, some curious hands, and a little willingness to get sprinkles in your hair.
Here’s how you can bring the fun to life today:
- Set out your Rice Krispie cereal, cones, and toppings before the kids arrive—prep makes everything smoother (and less sticky).
- Let everyone scoop and decorate their own “ice cream” creations—there’s no wrong way, only “oohs” and “aahs.”
- Use parchment or a muffin tin to keep cones upright and tidy while setting.
- Store leftover rice krispie ice cream cones in an airtight container for sweet treats tomorrow (if they last that long!).
- Share your kitchen victories, photos, or funny mishaps in the comments—your tips may inspire another family’s memory.
Ready to see sticky, joyful fingers at your table? Jump into making rice krispie ice cream cones tonight—even a little mess is a sign of shared celebration.
Because the best desserts don’t just taste sweet—they turn everyday moments into stories you’ll retell for years. “The loudest smiles start with the simplest treats.”
Classic Rice Krispie Ice Cream Cones Recipe
These rice krispie ice cream cones are your ticket to big smiles and easy kitchen magic. You’ll love shaping gooey scoops and decorating cones for parties, bake sales, or movie nights—no oven or special tools needed!
Ingredients
Instructions
- Combine 5 cups mini marshmallows and butter in a large microwave-safe bowl. Microwave on high for 1 minute, then stir until smooth.
- Add Rice Krispie cereal and gently fold until evenly coated. Stir in the remaining ½ cup marshmallows and sprinkles (for gooey pockets).
- Grease your ice cream scoop and hands with nonstick spray or a bit of butter. Scoop out warm mixture, gently pressing into round “ice cream” scoops. Place on wax paper to cool for a few minutes.
- Melt chocolate chips or candy melts in the microwave until smooth. Dip the rim of each cone in chocolate and let any extra drip off. Drop a few candies inside each cone to help balance.
- Carefully press a rice krispie scoop onto each cone, standing upright (use a muffin tin for support).
- Drizzle tops with more melted chocolate, add sprinkles, and finish with a maraschino cherry or your favorite candy.
- Let cones cool at room temperature until set, about 10 minutes. Store in an airtight container for up to 2 days—if they last that long!
Nutritional values
Servings: 12 ServingCalories:150kcalTotal Fat:4gTotal Carbohydrate:29gDietary Fiber: 0.5gSugars: 15gProtein:1g
Note
- Want more color? Use candy melts in fun hues (pink for strawberry, green for mint) or try mini cones for bite-size treats.
- My favorite fix for sticky hands: grease everything first—scoops, bowls, and palms!
- Picture this: A tray of sprinkle-topped cones, giggling kids, and big, proud grins—messy hands, big memories, and pure joy.
“Sticky fingers, silly grins—these rice krispie ice cream cones are always a party hit!”
“A no-bake dessert the whole family will cheer for—share your creations in the comments!”